Retrieving Tile Information at Runtime with Tiled2Unity
20 September 2015
Hi there! Tiled2Unity is no longer in development nor supported. Use SuperTiled2Unity to import Tiled Map Editor maps into your Unity projects instead.
If you are building a strategy or RPG style game then there’s a strong chance that you need to get at specific information about each tile placed in the world. Unlike platformers, where tiles are decoration, each tile is an important part of your game logic. In this post I’ll show you two techniques to easily add such support to your Tiled2Unity projects.
Which approach you take will depend on the specific needs of your game measured against performance and memory usage. In my opinion, a good rule of thumb is to ask if your game is more like Advance Wars and Fire Emblem (use GameObject approach) or more like Final Fantasy and Dragon Warrior (use PolygonCollider2D approach).
Tiled Automapping Feature
Both approaches make use of the powerful, yet regrettably arcane, automapping capabilities of Tiled. I recommend boning up on this feature as a prerequisite, and not just for this exercise. You will likely use this feature extensively once you understand how to create automapping rules for your Tiled maps.
Note: If you’re having a hard time figuring out how to use automapping, I found this video to be helpful in making sense of it all. It’s 10 minutes well spent.
Example Project Files
Tiled map files and C# source used in these examples is available on GitHub as a Unity project that you can run and experiment with yourself.
TileObject Approach (Strategy Games)
Turn-based strategy and board game style games typically require each tile on a map to be a central part of the gaming logic. Each tile instance, although similar to others of the same “type” has to know where it is on the board as well as manage other game state (say, which units are standing on it, or how it influences other tiles or sprites around it). This is best handled in Unity by having each separate tile be associated with a GameObject made up of Components unique to the game you are making.
To achieve this we’ll have our Tiled map automatically generate Tile Objects that, when imported, are consumed by a custom importer script. During this custom import step we will attach GameObjects to our map prefab that is simply placed into a scene to do it’s job.
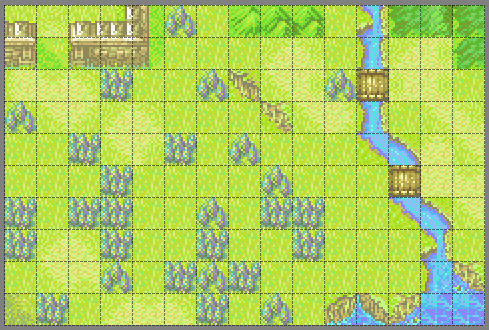
For this example I’ll use Fire Emblem as inspiration. Here’s the map from the first chapter of that game in Tiled:
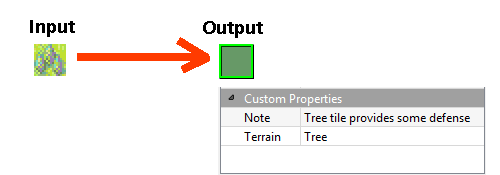
For now, I’ll focus on the trees. What we want to do in Tiled is set up a rule that will place an object with custom properties on it in an output layer every time it sees a tree tile as input:
Working with automapping rules in Tiled at first can seem tricky. See fe-rules.tmx in the example files to see how I'm setting up rules for the Fire Emblem example.
Applying that rule you can see how a Tiled Object was placed upon every tree tile in the map:
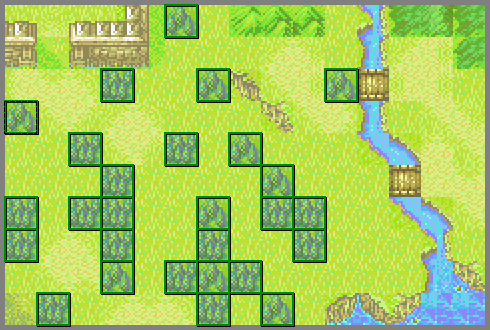
Once our automapping rule is created we see that objects are automatically added to our map.
Upon export into our Unity project, those objects are added to the map prefab as Unity GameObjects. There isn’t much to them originally besides a BoxCollider2D so that’s where our custom import script will come in.
[Tiled2Unity.CustomTiledImporter]
public class CustomImporter_StrategyTiles : Tiled2Unity.ICustomTiledImporter
{
    public void HandleCustomProperties(GameObject gameObject,
        IDictionary<string, string> customProperties)
    {
        if (customProperties.ContainsKey("Terrain"))
        {
            // Add the terrain tile game object
            StrategyTile tile = gameObject.AddComponent<StrategyTile>();
            tile.TileType = customProperties["Terrain"];
            tile.TileNote = customProperties["Note"];
        }
    }

    public void CustomizePrefab(GameObject prefab)
    {
        // Do nothing
    }
}
The CustomImporter_StrategyTiles.HandleCustomProperties method is invoked for every Tiled Object in our map file. As you can see from the code above we are looking for the custom properties we’ve added to our Tiled map and, once found, we shove them into a custom component to be used by our game.
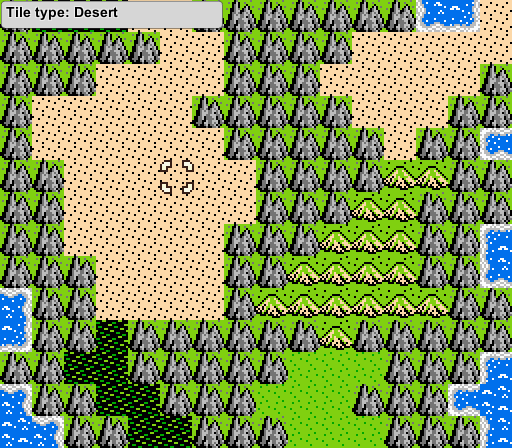
After filling out our automapping rules for all other tile types (mountains, water, grass, etc..) and re-exporting we now have a prefab, fully constructed by Tiled2Unity, that has unique data associated with every tile. In the example provided, I simply do a raycast off of mouse button click to find out which tile we’ve “selected”. I also keep a count of how many times you’ve clicked on that tile to demonstrate that game state is kept on a per-tile basis.
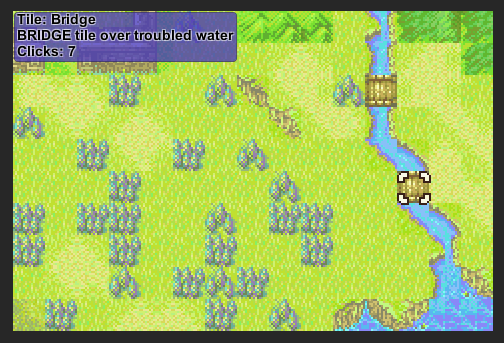
In the example demo, you can click on any tile and see what game state data is associated with it. Here, the game state is simply the number of times each tile has been selected.
Word of warning: Keep in mind that in this example we are (automatically) creating an object for every single tile placed in Tiled. This works well for games with smaller maps where you’ll have on the order of several hundred such objects. However, for larger maps the number of game objects in your scene could easily affect memory and performance. Remember that a 256×256 map will have 65,536 such objects which is likely too much complexity for Unity projects.
PolygonCollider2D Approach (RPG Games)
In RPG style games we are often more concerned by the “type” of tile our player is standing on as opposed to the exact tile instance. (In other words, we want to know if the player is in a forest, but we don’t care about a specific tree.)
This is a great job for the polygon colliders that Tiled2Unity creates from the Tile Collision Editor in Tiled. However, polygon colliders are created on a per-layer basis and it’s a total pain in the ass to have to manage separate layers for each type of tile we may have in our game.
Again, this is where automapping can help us and in this case the mapping rules are dead simple. All we need to do is take every tile from a single input layer and output the exact same tile to a particular output layer — one for each type of tile.
Our working layer is the only layer we need to manipulate in Tiled. However, it is exported as one big collision. We can't tell if we collide against water or mountain or grass tiles.
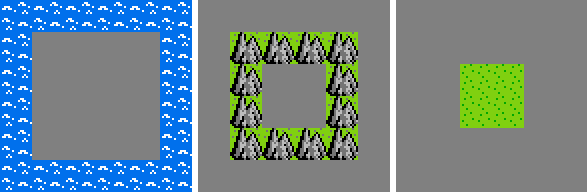
By setting up rules to automatically create output layers for each tile type we can export the map with separate colliders for each type of tile in our game.
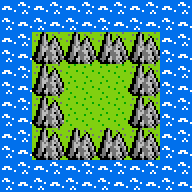
Setting up our rules this way allows us to work in only one layer and have all the output layers created for us automatically. The example contains part of the Dragon Warrior overworld (Charlock Island) with the polygon colliders set up for each tile type. We just do a raycast from the mouse position to see what kind of tile we selected.
In the Dragon Warrior example we can select which type of tile we are interested in.
You can see how this would work for a proper RPG style game, giving you the ability to spawn monsters that belong to a particular type of terrain. You get the added bonus of having collision detection for parts of the world you want to keep your character out of. (Also note we don’t need custom importer scripts for this example.)
Can’t There Be An Easier Way?
All things considered? I don’t think so. I often get requests from developers that “just want to get a tile” at runtime thinking that data should be right there waiting for us. I see two problems with that:
- Maps grow with quadratic complexity. One of the chief benefits of Tiled2Unity is the simplicity of minimal meshes and polygon collider objects that are made to work with Unity. Managing objects on a per-tile basis, for all Tiled2Unity users, would undo that.
- What would per-Tile information look like anyhow? In my mind, there is no way to make a general, one-size-fits-all offering for this. All data in Tiled is text but when we consume it in our game it must be in a format that makes sense for our specific application.
Having said that, with some clever use of features already available to us and maybe a little tool-side scripting you should be able to make Tiled and Tiled2Unity work for you in ways that are unique to your game development needs.

Hi! My name is Sean Barton (aka Seanba).
I’m an American-Canadian software developer working in Austin, Texas where I never have to shovel snow. ![]()
My career focuses exclusively on video game software and tools. You can read more about me here.
Aseprite2Unity imports sprites and animations for use with your Unity projects. Like all my tools it is available for free or name your price.

SuperTiled2Unity is a collection of Unity scripts that import Tiled Map Editor files to your Unity projects. You can download for free or name your price.
(Note that regular Tiled2Unity is now deprecated.) ![]()
Like my tools? Consider making a donation as a way of thanks!