Introducing Tiled2UnityLite with Support for OSX/Linux
31 December 2015
Hi there! Tiled2Unity is no longer in development nor supported. Use SuperTiled2Unity to import Tiled Map Editor maps into your Unity projects instead.
Update: Tiled2UnityMac is now available (as of version 1.0.7.0) for Mac OS X with a full-fledged GUI.
Happy New Year’s Eve!
Over the holidays I decided I was finally going to do something about helping our friends on OSX and Linux systems get Tiled2Unity working within their development environments. I’m now happy to say that a command-line version of Tiled2Unity (named Tiled2UnityLite) is now available that gives any platform running Mono and CS-Script the capability of exporting Tiled maps into Unity.
Don’t let the name fool you: The ‘Lite’ part simply means there is no GUI like in Tiled2Unity proper. You still get the exporting options we’ve been enjoying on Windows for some time now. The only thing you’re really missing is the previewer in the Tiled2Unity GUI but I suspect that feature isn’t used all that much anyhow.
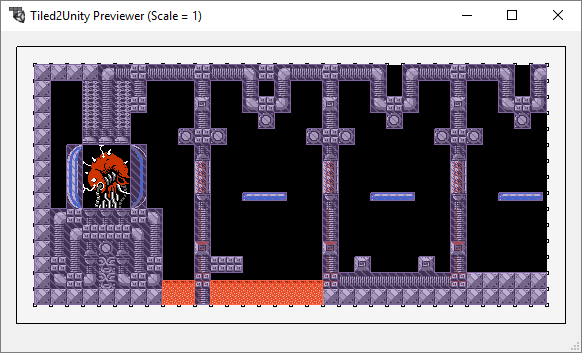
The Tiled2Unity Previewer takes great screenshots but once your map is set up for rapid edit-and-export it becomes less useful.
A benefit of Tiled2UnityLite is that it is distributed as a single C# file. This makes it useful for making Tiled2UnityLite part of an automated build pipeline as well.
Below I explain how I got Tiled2UnityLite to run from Tiled Map Editor on a MacBook running Yosemite. Eventually, the goal is to have it set up where you press F5 to automatically export TMX files to Unity. This can be a (one-time) pain for some depending on how comfortable they are with environment variables and shell scripting. (I’m by no means an OSX power user so if someone comes up with better instructions I’ll be happy to post them.)
The main gist is this:
- Install Mono (Windows users don’t need to do this, nor invoke
monoon the command line) - Install CS-Script
- Download Tiled2UnityLite.cs
- Run a command from the terminal that runs
Tiled2UnityLite.csthrough CS-Script
The command should resolve to something like this:
mono cscs.exe Tiled2UnityLite.cs YourMap.tmx YourProject/Assets/Tiled2Unity
Installing Mono
Just go to the Mono website and follow their instructions. Piece of cake.
Installing CS-Script
CS-Script is a clever utility that allows you to use C# as a scripting language. Time was I used Ruby for all my scripting needs but I find myself writing C# and executing it at runtime through CS-Script more and more now. It’s a great tool — and it’s the key to having Tiled2UnityLite work on systems I hadn’t planned on supporting.
However, I did have some difficultly getting CS-Script running on OSX. This is likely due to my weak sauce Mac-fu but perhaps my instructions will be of help to others anyhow (El Capitan users and others wanting to install CS-Script to a directory of their choosing see import update below):
- Download CS-Script from their website
- Unzip, rename folder from
cs-scripttoCS-Scriptand copy folder tousr/share/- The CS-Script executable should be as this location:
/usr/share/CS-Script/cscs.exe
- The CS-Script executable should be as this location:
- Give
usr/share/CS-Scriptexecute and write permissions- In the terminal:
sudo chmod 777 /usr/share/CS-Script
- In the terminal:
I also needed to update my .bash_profile file so that CS-Script was in my PATH:
export CSSCRIPT_DIR=/usr/share/CS-Script
export PATH=$PATH:$CSSCRIPT_DIR
At this point you should be able to run CS-Script from the terminal:
mono $CSSCRIPT_DIR/cscs.exe -v

C# Script execution engine. Version 3.9.20.0.
Copyright (C) 2004-2014 Oleg Shilo. www.csscript.net

   CLR:            4.0.30319.17020
   System:         Unix 14.0.0.0
   Architecture:   x86
   Home dir:       /usr/share/CS-Script
With that achieved we’re ready to run C# files as a script.
Update for El Capitan users: The directions above won’t exactly work because El Capitan does not allow write access to /usr/share. Try these modified steps as a work-around:
- Install CS-Script to this location instead:
/usr/local/CS-Script - Add this to your .bash_profile:
export css_nuget=/usr/local/CS-Script/nuget - (Actually, these directions should allow you to install CS-Script anywhere.)
Download and Run Tiled2UnityLite
You can download Tiled2UnityLite from the Tiled2Unity download page as a separate zip. This zip contains two files:
-
Tiled2Unity.unityproject- Include this package in your Unity project. -
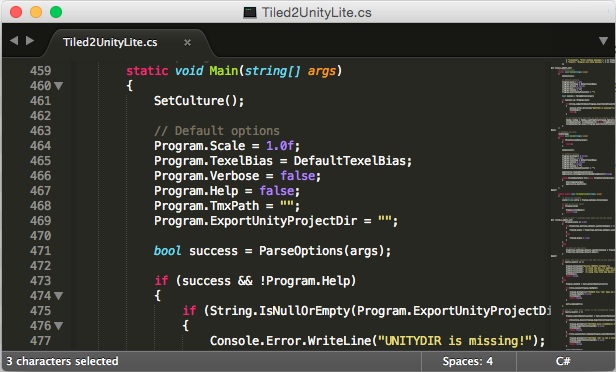
Tiled2UnityLite.cs- The C# file that contains all the Tiled2Unity source, all 10,000+ lines of it, with all the Windows-specific stuff excised out.
Go to the directory you’ve unzipped Tiled2UnityLite.cs to and run the help command on our script.
mono $CSSCRIPT_DIR/cscs.exe Tiled2UnityLite.cs --help

Tiled2UnityLite Utility, Version: 1.0.1.0
Usage: Tiled2UnityLite [OPTIONS]+ TMXPATH [UNITYDIR]
Example: Tiled2UnityLite -s=0.01 MyTiledMap.tmx ../../MyUnityProject/Assets/Tiled2Unity

Options:
  -s, --scale=VALUE          Scale the output vertices by a value.
                               A value of 0.01 is popular for many Unity
                               projects that use 'Pixels Per Unit' of 100 for
                               sprites.
                               Default is 1 (no scaling).
  -t, --texel-bias=VALUE     Bias for texel sampling.
                               Texels are offset by 1 / value.
                               Default value is 8192.
                                A value of 0 means no bias.
  -v, --verbose              Print verbose messages.
  -h, --help                 Display this help message.

Prefab object properties (set in TMX file for each layer/object)
  unity:sortingLayerName
  unity:sortingOrder
  unity:layer
  unity:tag
  unity:scale
  unity:isTrigger
  unity:ignore (value = [false|true|collision|visual])
  unity:resource
  (Other properties are exported for custom scripting in your Unity project)
Once your environment is configured to run Tiled2UnityLite like this then you are ready to export Tiled maps directly from Tiled Map Editor into your Unity project using the Execute Command GUI.
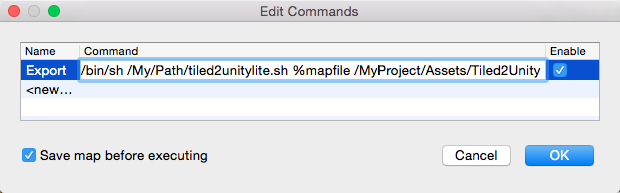
/bin/sh /MyPath/tiled2unitylite.sh %mapfile /MyProject/Assets/Tiled2Unity
You’ll notice I decided to run a shell script from Tiled when exporting to Unity. I’ll explain that a bit below but for now the command I use in Tiled is broken up into a number of parts:
-
/bin/shThis tells the operating system we’ll be running a shell script. -
/My/Path/tiled2unitylite.shThis is the path to the shell script that will be running Tiled2UnityLite.cs through CS-Script with the arguments that follow. I use a shell script because I need a bit of help controlling the environment variables of the system (they are different when you launch an app as opposed to using the terminal). -
%mapfileTiled will replace this with the full path of the TMX file currently in focus. -
/MyProject/Assets/Tiled2UnityThe path to the Tiled2Unity folder in the Unity project you want to export to.
The tiled2unitylite.sh shell script is pretty standard fare:
#!/bin/sh

THIS_DIR=`dirname $0`
pushd $THIS_DIR > /dev/null 2>&1

CSSCRIPT_DIR=/usr/share/CS-Script
mono $CSSCRIPT_DIR/cscs.exe -nl Tiled2UnityLite.cs "$@" &> tiled2unitylite.log

popd > /dev/null 2<&1
You’ll note that I’m redirecting the output from Tiled2UnityLite.cs into a tiled2unitylite.log file (Quick note: You will have to create this log file before running the script). This helps me track down any errors that may be reported. I use the the tail command in another terminal so that I can track export progress in real time.
tail -f tiled2unitylite.log
With everything finally configured I’m able to, on a Mac, press F5 to export a Tiled map into Unity. Here’s a quick example from one of my most cherished memories in gaming history that old school gamers will quickly recognize.

In Tiled, I can press F5 to execute a command on the currently loaded map. In this example that command will export the map, through Tiled2UnityLite, to my Unity project.
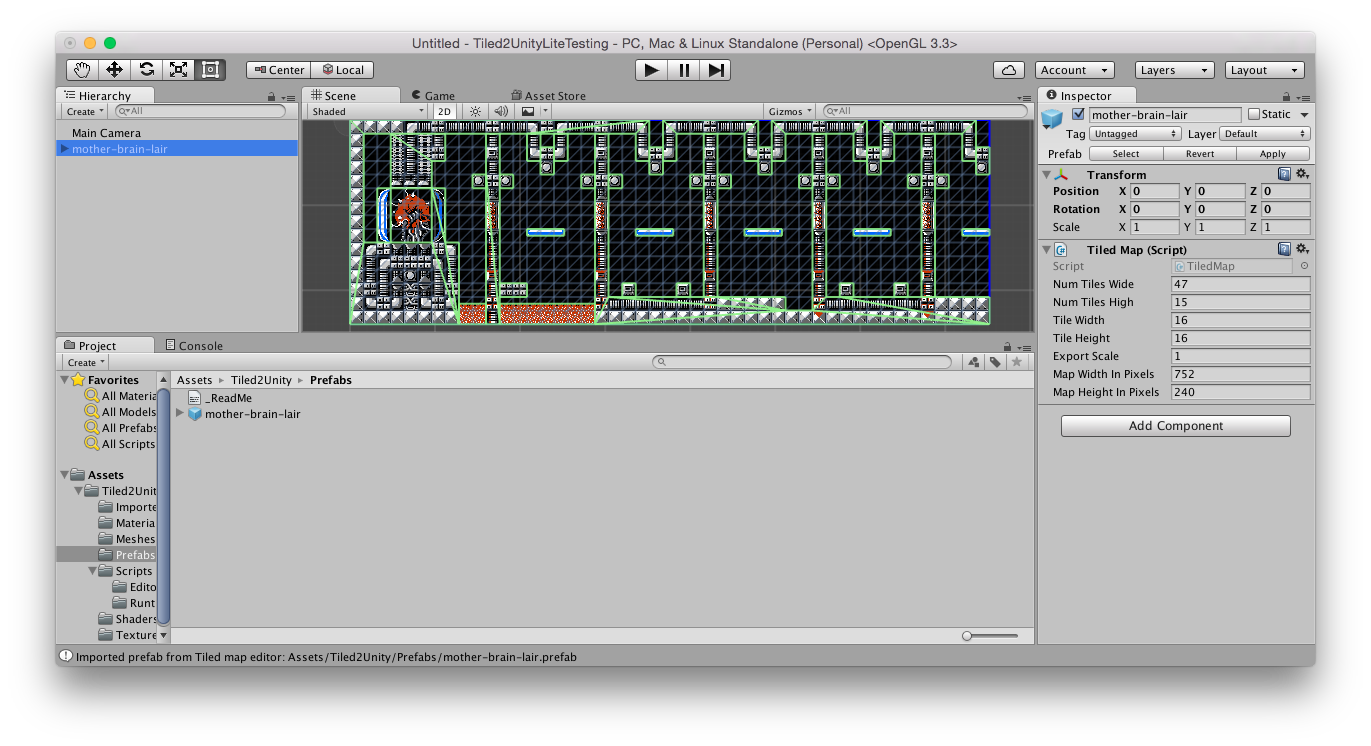
Once exported to Unity, I can put the constructed prefab into my scene. As you can see, the tile layers and colliders have been successfully imported.
Now Accepting Donations for Tiled2Unity Development
Perhaps this is hard to believe but pleased Tiled2Unity users do ask if they could thank me for this tool by making a small monetary contribution. In the past I’ve asked them to support the Tiled Map Editor Patreon instead (which is still a priority, support that first!) but I do believe that Tiled2Unity has now matured into a valuable piece of software. Tiled2Unity will always be free but if you’d like to send a small gift my way I will accept it with pride and appreciation.
And on a personal note, with the new year just a few hours away, I wish you all an enjoyable and productive 2016. Have fun and keep working on your game.
Hi! My name is Sean Barton (aka Seanba).
I’m an American-Canadian software developer working in Austin, Texas where I never have to shovel snow. ![]()
My career focuses exclusively on video game software and tools. You can read more about me here.
Aseprite2Unity imports sprites and animations for use with your Unity projects. Like all my tools it is available for free or name your price.
SuperTiled2Unity is a collection of Unity scripts that import Tiled Map Editor files to your Unity projects. You can download for free or name your price.
(Note that regular Tiled2Unity is now deprecated.) ![]()
Like my tools? Consider making a donation as a way of thanks!